Monday, August 08, 2011

Three 365’s and a Mojo–catching up!

I’m so far behind on posting my cards that I think I’m ahead.  I have several cards waiting to be published for the 365 challenges so trying to post them in small groups and also a new Mojo because my sister Nina is visiting (having way too much fun!) and so we did the Mojo right off the bat this afternoon. 

Here are the 365.blogspot cards  first. 

365 Day 155 – Days of Peace

We were challenged to use a Peace Sign anywhere on a card with anything we wished.  This is what I came up with. 

Day-155_Barb-Derksen_full

I chose a paper I bought last time I was at the coast – it’s from The Paper Company and is supposed to look like raindrops.  Very cool and feels nice too.  I cut the peace sign out using my Silhouette SD, then I glued and glittered it.  I embellished it with odd bits of jewellery, gems, charms and some simple silver and black ribbon.  I printed the sentiment out on paper and covered it with vellum. 

Day-155_Barb-Derksen_close

This card would be nice for anyone! 

365 Day 156 – When Life Hands You Lemons

We were asked to make a card to cheer someone up – using words – and/or – images to convey this message.  So I made …

Day-156_Barb-Derksen_full


Just a pretty simple and bright card.  I cut the lips out with my Silhouette.  I used random papers, I am sorry I don’t know the brands.  I backed the mouth with glittery white paper.  I cut the word out using the showcard gothic font.  I embellished the ! with a red gem.

Day-156_Barb-Derksen_close

Come on… I know you want to smile Winking smile 

365 Day 157 – Ad Inspired

We were asked to take our idea from this ad photo:


I interpreted it this way:

Day-157_Barb-Derksen_full

I actually had a lot of fun making this card.  I started out with the image from Graphics Fairy which I cut and printed – {print from printer – then cut using my Silhouette SD} I used Martha Stewart craft glue and glued various beads onto the form and then added a glittery heart charm at the throat. 

Day-157_Barb-Derksen_close

Day-157_Barb-Derksen_close2

I printed my own sentiment right onto the pattern paper along with another copy of the mannequin.  After the glue dried (overnight) I then used foam tape and glued the form onto the one on the card to achieve a raised effect.

Day-157_Barb-Derksen_close3

After adding a ribbon, button and inking the edges I was done. 

Mojo 203


I built my card alongside my Sister Nina and so I had the benefit to learn a few techniques.  I’m a very “hands on” and visual learner and once I see something actually done then I’ve got it! 

mojo203-full

I cut this beautiful rose out using my Silhoutte SD – the cut itself is a two part one which I got from SVG Cuts.  They have some beautiful products there. I embossed with a “glass” powder and then dusted the edges with light inking.  I put a pearl embellishment in the centre of the rose.

mojo203-close

I cut the border out of vellum and then inked the edges with gold and drew on little swirls and hearts.  I cut the leaves out on my SD – the design for the leaves is my own.  After adding two layered ribbons and writing my own sentiment on one leaf I was done.

Whew.  I still have more cards to post yet. You’ll want to wander over to my Sister’s blog to see her beautiful card too!

Thanks for coming by ♥

Sunday, August 07, 2011

Quick Post–Mojo No. 202–my second attempt

My sister Nina says “Hurry, hurry, you have less than 22 minutes to get your card in!” So, not wanting her to suffer a coronary on my behalf here is my second attempt at this week’s Mojo 202.

First the sketch:


And here is my take:

mojo202-2-full

The stamp is from TPC Studio, triangles stamped with “Banners for All” by Stamps of Life. I layered three times with cardstock using my own scallop edged circle cutiouts.

mojo202-2-close

I used random beads and created the flower and leaves. 

More cards to come!

Saturday, August 06, 2011

Days 153 and 154 Challenge Cards, beautiful Yarrow Bouquet and … my SISTER arrives 2-day!


I’m so happy, summer is really and truly here.  All those rainy and dreary months we had for the first half of the year make it all the sweeter.  Enjoying a wonderful stay-cation and feeling fabulously creative these days.  We’ve fallen into a routine of waking, working out, creating, swimming, delicious dinners and romantic evenings.  Hope you are having a wonderful time wherever life finds you too.   I like the stableness of these days but I am looking forward to shaking it up with a visit – starting today no less – with my sister Nina who will be arriving in a few short hours.  So I thought I’d better get my blog post in now because there is going to be a lot of action around here soon. 

I’ve been working very hard to try and take up the torch with the 365 Cards blog challenges this past few weeks – in fact I even got a small mention on Day 155 {toot toot!}  I am actually all the way up to Day 158 after burning the midnight oil once or twice this week but I will just post two a day so that I don’t overwhelm everyone.  So here goes:

Day 153 – Super Sketchy Monday  – we were given this sketch


And here’s what I managed to create with it:

Day-153_Barb-Derksen_full

I had such fun with this.  I think when I do this one again I would make Mr Froggy much larger to balance the card a bit. 

Day-153_Barb-Derksen_close2


I cut Mr Froggy from a svg cutting template I got from svgcuts.com  - they have some FABULOUS cutting files there.  A note, I had to convert the file to be able to use it with my Silhouette SD cutting machine.  This little froggy is going to be used a lot I can see.  I made his eyes glitter with silver gems. Isn’t he too cute? 

 Day-153_Barb-Derksen_close1

I made my own lily pad and lily. I inked up the edge of  the lily with deep pink ink and then I sprinkled clear glitter over glue to make it shimmer.  I am posting the .studio files here for the lily and lilypad for download for you here:

LilyPad Shape – Silhouette SD file

Lily Shape – Silhouette SD file

I’m sorry that I’m only giving these files in .studio files because I actually created them inside of the Silhouette SD software and I don’t know how to export as png for you. 


Day 154 – Card Recipe Challenge

For day 154 were shown this card – Annie’s take on the challenge, as an example:


Along with these instructions:

4.25x5.5 card

Scallops (anywhere on the card)

3 Buttons

1 Stamped image

A sentiment (done any way you want)


Here’s my take on this challenge

Day-154_Barb-Derksen_full

I am sorry that I cannot name neither paper nor stamp brands as they had no brand names present.  I chose a complementary color theme of purple and yellow.  I like it!  I stamped onto vellum and then backed it with some white cardstock so that the writing and flower would show up well.  I then coloured in the flower with a felt.  I added a purple gem to balance the card out.

The buttons were fun.  I cut out three deep purple blossoms from cardstock using a graphic cutout that comes standard with the Silhouette SD software.  Then I took a seed pearl and threaded a piece of thin jewelery wire (dollar store) through the center holse of the button  and then adhered each onto three rich yellow buttons with foam tape and then stuck them all onto the card.  Both scallops were created using Fiskars. 

♥

Yarrow1

We have a bumper crop of yarrow (at least I believe that’s what this is) growing this year and I kept looking at it and thinking it would make a striking display so I vowed to do that and got up early one morning recently and accomplished just this.  I took photos of how I put it together, in case you might like to try this too:

Yarrow2

After choosing nice tall blossoms, I stripped each {right in the field} from any leaves and then I laid 1/2 dozen at a time on the cement and then cut the stems to an equal length.

Yarrow3

Once they were all trimmed I gathered them all together in a bundle.

Yarrow4

The end result, once placed in a tall vase (vase about 18 inches tall) is a striking focal point of the room.  Both summery but will bring warmth into the room on cold winter days.  These blooms will dry right in the vase, they stay remarkably brilliant.

♥

Ice Cream Pie Love

Barb-Derksen-ice-cream-pie

Ever since I read the June issue of Sunset magazine my Mr and I have been making our own Ice Cream Pies.  It was so encouraging finding this idea/recipe because I went looking for a good dessert in town a few days ago and returned home empty handed.  We live in a small community and the fare selection available when I looked was pitifully limited and what there was cost $$$ – so when I saw the recipe we HAD to make it.  It was my husband’s turn so he created this one.  We put it in a 7 inch cheesecake pan which has parchment paper underneath.  A simple oreo crumb crust, unbaked.  mmm – to die for.  Making small ones means we get to try new recipes all of the time.  A hint from my Mr – make it in “layers” and freeze between each one.

What’s your favourite summer dessert? 

Wednesday, August 03, 2011

Mojo 2-oh-2 Card AND a 365 Cards as well… creative days (Freebies for YOU!)


I hope you all are having a GREAT summer!  I’ve been on a super creative streak and loving it!  I’m finding that taking part in card “challenges” helps me to get focused and accomplish my goal of completing at least one card a day, which I hope to do because I know we will be taking some days off here and there for camping.  Speaking of which, my husband and I took a day off yesterday to take our vw van (Seb, yes, it has a pet name) for some re-repairs (a faulty part so no charge whew!)  While we waited for the repairs we went on a three hour hike, up and down Giant’s Head Park in Summerland.  Quite the little workout for our legs but well worth it for the view. 

Miles_Summerland

Yep, that’s my man – he makes any backdrop pale in comparison!  

It was a fun day away, and I got to visit the thrift store in Summerland.  I’d rank it as #2 on my list of favourite thrift shops because it benefits charity, it has a terrific selection – always and the prices are excellent.  We also had lunch out and grocery shopped and did not get home until dinner time but I made myself mojo no matter what. 

So here is the sketch for Mojo No 202:


Won’t YOU join in the Mojo Challenge?


I must confess that I was daunted by this sketch, don’t quite know why, but I jumped in headlong, working my way out from the center of interest – the circle, and somehow it all came together in the end. 


mojo202-full

My photo does not do justice to the pretty paper.  I took this photo in the outdoor and I think the light affected the look – not exactly sure how to adjust it but its not too far off from reality.
 

mojo202-close

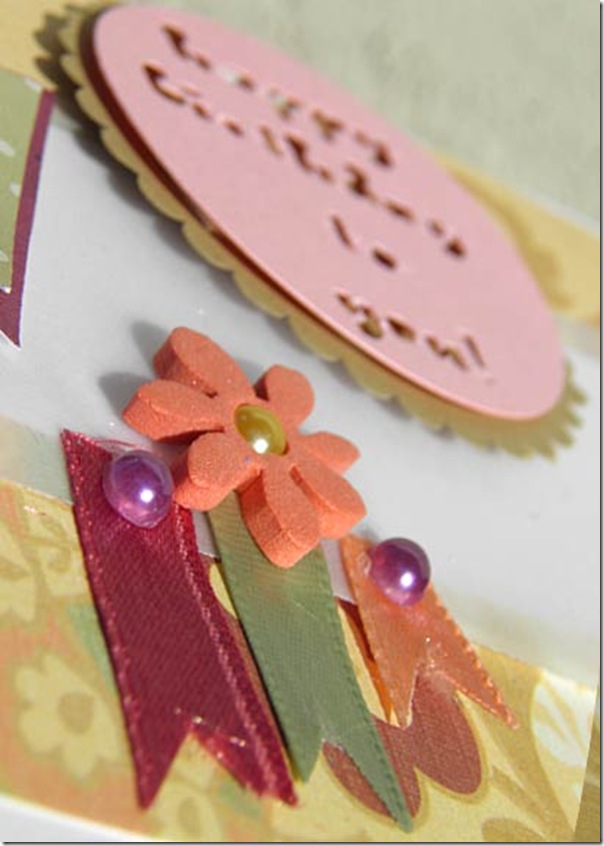
I’m sorry to say that I did not stamp my greeting because of two reasons.  The first is that I did not have a birthday greeting stamp I felt would “fit” with my card and the second reason is that I am in ♥ with my new Silhouette SD and use any excuse at all to make it jump hoops for me until I have mastered it.  So I cut the greeting out of pink cardstock, then layered it over another scallop edged circle.  I used a plain piece of white cardstock underneath another vellum layer for the center of my card.  Next I cut the two “flags” from a polka dot pattern paper, backed by slightly larger burgundy paper – both anonymous scraps in my collection.  The final touches to complete my card were the three ribbons – again repeating colors in my base paper and then the simple foam sticker (Creatology for ages 3+ – I’m definitely that haha – and I paid 25 cents for the entire box at a yard sale)  After staring at my card through slitted eyes (sorta fuzzes it all and then I can see where I need to fix or add – artists do this with their paintings all the time, believe it or not!)  I then embellished the ribbons and flower with pearls.  Voila!

And now I will share one of my 365 Card – I’m waayyy behind, have a few completed but backed up on my computer.  I will blog these over the coming days so I don’t overwhelm anyone. 

Here is a picture of Manoli’s creation – she challenged us to:

”This one requires you to add paint to the background.  You can do this any way you want and in any amount.”


And I must confess that I was tempted to skip over this one because I looked at it and thought “hmmm – work and time” and wasn’t sure I wanted to invest much of either until my Mr’s voice rang in the back of my head reminding me that my strength has always been my artistic talent.  So I decided to bite the bullet and just go for it.  Here is what I decided to create – along with a tutorial!


BarbDerksen_watercolorrose1

I tore a sheet of 140 lb arches watercolor paper to the full size of my greeting card (5.5 inches by 4.24)  I taped it onto a piece of cardboard using masking tape.  This is done so that when the watercolor paper takes liquid the tape will prevent the paper from buckling and also will allow it to dry flat.


BarbDerksen_watercolorrose2

Next I sketched in this wild rose.  I use a mechanical pencil – its always sharp and precise (I can never find a pencil sharpener when I need one also!)
 

BarbDerksen_watercolorrose3

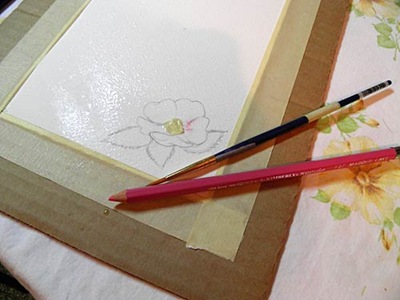
I placed a smidge of scrunched-up masking tape in the center of the flower because I don’t want paint in this area.  Watercolour is more difficult than other types of paint (eg: acrylics or oils) because you must leave the white of your paper for lighter areas – with oils or acrylics you simply brush white paint overtop of the areas you want painted white.   This said, watercolour is my favourite medium (besides plain old pencil and paper which is the basis of any good artwork!)  I like watercolour because it “moves” and it shifts and blends in with other colours and reacts with them.  I think of watercolour like I think of cats – you can control watercolour to a certain degree but there’s always the element of surprise with it – many, many times a successful painting has been created from a “happy accident” with watercolour paint. 

With the masking tape in place (and I could have used masking fluid for this as well, but this was quicker)   Next, I spray the paper lightly with a fine mist of water.  I am doing this deliberately because I want to have a bit of a “bleed” of the color.


BarbDerksen_watercolorrose4

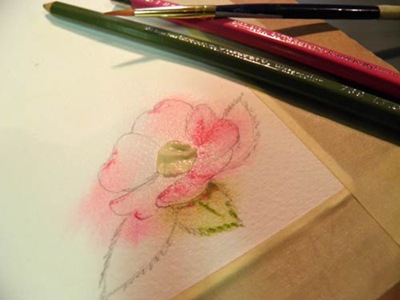
Then I start (watercolour) penciling in an olive green and crimson to begin defining both the rose and leaves.  I pencil, then “drag” the paint around using a lightly water-charged brush. 


BarbDerksen_watercolorrose5

After working with another darker green and then defining the center of the blossom with a pale green area, surrounding it with a circle of warm yellow – the final touch is to use a fine tipped felt to make the little stamen.  And there you have it! 

I’m going to place the blossom below this paragraph – just click on the picture to be taken to the download -  the full size (3 inches) jpg @300 dpi.  Feel free to use my  blossom  in your projects.  Please credit me and link to my blog if you use my image – and I would ♥ to see how you use it Smile 


OLYMPUS DIGITAL CAMERA


And how did my card turn out? 


BarbDerksen_watercolorrose-full

I like it!  I created a corner cut out template and cut it using my Silhoette SD.  I think I “nipped” the corners manually though, because I thought they look better rounded.  I also designed the dark green tag shape as well too – I will post them both below for your use – both in png format and in .studio for my fellow Silhouette SD users.  Enjoy – again, please, no pirates … if you want to share my files with friends, please have them come here themselves and scoop the goodies, and a comment would be very appreciated!

And YOU might want to join in and try a card – a – day over at the 365 blog too!


BarbDerksen_Scallop-hole_card face_landscape

Barb Derksen’s Corner Cut Template

download (png)

download (.studio)

BarbDerksen_DamaskTag

Barb Derksen’s Damask Tag

download (png)

download (.studio)

Saturday, July 30, 2011

Happy Anniversary to Family and Friends and Happy Holiday Weekend

445800_ribbon_and_hearts
HAPPY ANNIVERSARY 
to 
Barry and Judy
and 
Valinda and Jim
 
Congratulations to both “sets of you”!    Both Judy and Valinda have blogs so if you feel the urge to go visit and wish congrats them yourself!  Judy has posted today with a special bouquet you must see!

In honour of this momentous and romantic celebration I’ve created another design for YOU!   I made this sweet fish which I then had (of course – keeping with my trying to make an original card every day) to make a card to show how this design might look on YOUR own card. 
 
Barb-Derksen_fishy_fulll
First I cut out my fish using the design I will post at the end of this ramble.  I can’t say I’d pick the same paper for the fish next time but I’m not entirely displeased with it and it at least gives me (and better yet YOU) some good ideas.  I don’t know what brand of papers these are, just remnants I had around.  The red paper for the lips, tail and fin are a nice shiny red – hard to appreciate in my photo.
 
Barb-Derksen_fishy_close1
I cut the top and bottom papers out using a scallop edge and then brushing the edges with some ink from Michaels in a hot pink.
 
Barb-Derksen_fishy_close3
I cut the “bubbles out of patterned cardstock paper and then dusted them with clear glitter.  I harvested the feminine googly eye from an old greeting card (the ladies at the local thrift store collect and save them for me!)   My original download file for YOU does have an eye included though.
 
 
Barb-Derksen_fishy_close2
 
I made my own little fish hook and fishing line using two different wires.  The thicker wire is just a plain one for jewellery and the red “line” is thin wire I bought at the dollar store.  They come in very pretty and useful colors. 

Photobucket

I've entered my tiny hook and line into the "I Was Caught" post at My {re}purposed life today - why not wander over there too - some terrific ideas [including some for Silhoutte SD]
 
So now I’m offering this design here for YOU as a free download both in PNG format, layered PSD and .studio file (specifically for Silhouette SD)  to use as you wish – the only stipulation being you must credit me and and link back to my blog.  Please do not share the download link, rather have your friends come here and download them for themselves (and I’d love a comment!)  If you use my designs for a project, why not send me a jpg and I’ll feature you? 
Just click on the preview below to be taken to the download for the zipped file for all three file types (I’ll also post the plain .studio file under the Silhouette tab, top of the blog) as well as in the Vault.
BarbDerksen_LoveFishy_prev

Friday, July 29, 2011

Another 365 Card challenge completed and FREE Silhouette cutting files!

I decided to keep with my accomplishing at least one card a day while learning how to use my Silhouette SD.  This challenge is from 365 Cards, Day 150 - Background challenge and the rule was:

"Create a background for your card using wet and/or dry embossing"

This is my take on the challenge - which my Mr said was the best card I've made to date.  I love it, but I'd beg to differ.  though I love the preciseness of it, I am more for the artistic side of things.  I take his praise highly though, as he does not dispense it out for just any old card! 


The pretty flower file was a free download from SVGCuts (loads of high quality items for sale here and some terrific freebies too!)  The flower file came in several pieces and I had to actually take the file into illustrator to covert it into a png which I could then trace and cut with my Silhouette. 


I created the next three shapes in the Silhouette software - and I've posted the last two in a "page tab" top of my blog where you can download them for FREE.  I did not provide the one for the tag because all I did for that one was "drew" a round cornered rectangle twice, enlarging one and then punching a hole for it so it turned into a tag.  The Happy Birthday stamp was a small Studio G from Michaels - I use this one over and over as its just the right size. 

I used a tiny bit of colored wire for the "string" for the tag - the dollar store has pretty colored wire for pennies!  

I forgot to mention that I added a film of glitter over the cut out paper flower. 

Off to tackle today's challenge! 

Total Pageviews

Popular Posts