Showing posts with label Mrs Miles Freebies. Show all posts

Monday, June 20, 2016

Baby Milestones Heart FREEBIE for your Silhouette

Baby-Milestone---Barb-Deksen-prev-1

Baby-Milestone---Barb-Deksen-prev-2

A little tiny nose, ears like two delicate shells, rosy cheeks and soft lashes, downy hair and sigh-soft baby skin – I’m a Gramma for the second time and I wanted to celebrate by making a FREE cutting file which will help me mark each milestone along the journey.  I couldn’t find anything out there that was already made up so I designed my own. 

Baby-Milestone---Barb-Deksen-prev-3


DOWNLOAD

(Zipped File Folder)

For PERSONAL use only

This download includes all you need to mark off all the special months and years.  This is a sweet prop which you can customize as you need.  Personally – I used the small single heart template(move the “1 month old” off before cutting”  out of paper but then used it to cut a nice stiff heart from foam core board.  The outside “frill” from paper – I chose a pretty watercolor paper (on the firm side)  The numbers have coordinating offsets.  I used black vinyl for the black offset, then glitter cardstock for the actual numbers, gluing them on.  This ends up being just over 6 inches in size, the perfect finishing touch to baby’s photos. 

Enjoy!

Any suggestions of what else I might design for baby?

Friday, March 13, 2015

Easter Box FREEBIE and 365 Photo of the Day

365 Photo of the Day

March 12 2015 Barb Derksen

Makes me think of this song, which I heard plenty of as a calf, parnder.  Isn’t that tumbleweed HUGE? 

A FREEBIE for YOU! 

Without any further adeau, here is an Easter FREEBIE for YOU!


Easter-Egg-Gift-Box-1---Barb-Derksen

DOWNLOAD

Easter-Egg-Gift-Box-6--Barb-Derksen

Easter-Egg-Gift-Box-2---Barb-Derksen

It’s got its own little picture window (you can cut and paste a bit of plastic there or leave it open whichever you wish.  There is a little “shelf” inside with a hole where you can put an Easter Egg. 

I used a real, hard boiled egg, and it could have been either medium size or large, but if you used a smaller candy egg you might just tuck some packing shredded paper under the shelf to prop it up.  I hope you enjoy!

This project cuts out of a single sheet of 12 x 12 paper with plenty of space left to make extra elements to glue on your box. 

Wednesday, February 25, 2015

Simon Says Monday Challenge & a FREE cutting file!

I just ♥ when a challenge comes along the exact time I’m thinking up a new creation in my head.  This is just what happened when I saw this Monday’s Simon Says Stamp Monday Challenge and the theme is No Rules.

I decided to step up to the plate with a new cutting design I dreamed up in my head and will also offer it to you today too!

Gift-Box-with-Tags-prev-4-Barb-Derksen

I decided to create this gift box and little gift tags set from the ground up.  I thunk it all up in the night as I fell off to sleep.

Gift-Box-with-Tags-prev-2-Barb-Derksen

Gift-Box-with-Tags-prev-5-Barb-Derksen

After I designed this cut for your Silhouette cutting machine (I have a Cameo) I made a few tweaks and then added these darling little gift tags as well.  This designer paper I chose “Fanciful Be You” by Junkitz is double sided so I added a piece of plain pink copy paper to the inside so the tags can be written in.  If you’re using one sided paper you won’t have to. 

Gift-Box-with-Tags-prev-3-Barb-Derksen

And after the tags were all assembled with bits of twine (you might choose ribbon or sometimes I find crochet cotton is perfect for this as it comes in many colors and is inexpensive. Without further ado, here is the cutting file for you to enjoy.  I hope you’ll send folks here to download this FREEBIE – I do love a little comment ♥ if I must say.  Its like a hug for creating and sharing! 


Gift-Box-with-Tags-prev-Barb-Derksen

DOWNLOAD

zipped file with previews

Wednesday, January 28, 2015

Silhouette .studio FREEBIE - Paper Bracelet!

Bracelet Studio File 4 - Barb Derksen

Pretty cool isn’t it? 

This is one of the most unique and fun things I designed in the past I think.  I came up with the idea after looking at a leather belt and I simply felt compelled to design a miniature version and turn it into a bracelet. 


Bracelet Studio File 2 - Barb Derksen

The FREE .studio cutting file I’m gifting to you today is for the center piece – the paper part, the rest will be up to you, however you will like to design yours. 

As you can see I added all sorts of embellishments onto mine.  I chose to sew the little buckle part on and I sewed lace onto several as well.  I salvaged bits of jewelry and added beads to a few.  Because the bracelet itself is paper its pretty easy to sew through.  You may choose to use some sort of glue instead.  Its all up to you.


Bracelet Studio File 1 - Barb Derksen

Bracelet Studio File 5 - Barb Derksen


The tricky part is the prong.  I am providing the shape you will use as a template but I chose to cut the prong itself out of clear plastic packaging (the firmer the better) because its flexible and strong enough.  You can use the template I’ve provided to trace upon the hard plastic – or I simply held it fast with my fingers and snipped around the prong by hand. 

* I’m adding this bit in here after thinking as I was drifting off to sleep that I should give you a bit more accurate instruction of how the three pieces go together to get the buckle and prong on.  Please excuse my messy diagram, I’ve had to restore my computer and don’t have my vector graphics program of choice to illustrate, but hopefully my untidy drawing will help:

bracelet-instructions


  1. Cut your plastic prong out of a sturdy clear plastic (or you may choose to use colored too) using the template provided.
  2. Place the clear plastic prong in between the two open ends of the folded over “buckle” (the folded end will be the outside of the buckle. 
  3. Now that you have the prong inside of the buckle piece (and be sure to have the prong in front of the buckle, take the buckle and prong together and position both in the fold of the belt, lining the prong up with the hole on the fold, draw it through and up so that the buckle and prong are in position.  This is when you will either sew or glue the fold down.  After that’s done you can add the loop (which holds the tail of the bracelet down when you get it on your wrist. 

Bracelet Studio File 3 - Barb Derksen


Just so you know, these are delicate creations of “wearable art” – meaning because the main part is created out of paper (thick cardstock type designer paper works the best, double sided patterns create really nice “pulled together” pieces.  So these are fragile and they are not waterproof.  But they are original and completely unique. 

I hope you enjoy this FREE pattern.  I’d love it if you leave some comment love – and if you create your own I’d definitely delight in sharing your takes on this fun project. 

Barb Derksen’s Paper Bracelet File

DOWNLOAD

Personal Use

Saturday, June 28, 2014

The SLOOOOOWW Days of Summer - FREE Snail Cutting file!

Summer has begun officially - and now I feel it in my heart and soul too.  You know how this is sometimes - this queuing of a particular season in your heart?  I don’t know what throws the switch internally, be it the weather?  Where I happen to be? (I’m visiting at the moment, so looking with fresh eyes?)  Could it be the visit in itself?  (the relaxation of a day’s schedule and ability to be prone to wander at whim?)  Perhaps its the allowing of meals to ‘unfold’ rather than plan everything down to a T.

At any rate, I'm here. 

Another thought, maybe its the fact one can pack everything up into one suitcase (or in my case a nice plastic tub (so much easier to get in and out of fast)   It seems funny to need only what one has brought… what do I need an entire house of 'stuff’ for - or at the very least how grateful for my stuff knowing I have it all, and now should appreciate it too. 

And what is so rare as a day in June?
Then, if ever, come perfect days
Then Heaven tries earth if it be in tune,
And over it softly her warm ear lays.
Whether we look, or whether we listen,
We hear life murmur, or see it glisten.

Well, at any rate I’ve had some lovely walks these relaxing June days and enjoyed some sights I’ll share with you over the coming days.

1-Slug

On one of my ramblings here I noticed there are a lot of slugs and snails.  The slugs are quite monstrous beasts when viewed in macro mode of my camera.  I imagine myself towered over by huge versions of them in a good summer children’s story…about how they LOOK all mean and huge but they turn out to be gentle giants!

1-snail

But the snails, they are adorable to me.  Perhaps they make me think a bit like they have their ‘suitcase’ of all they need upon their back - ready to travel at any time, with all they need right where they are.  How can one not like a snail?

So, I decided to draw a snail.  I did and it turned out fine so the creative side of me carried it even a step further to make a cutting file to share with YOU!

Snail-Card2_Barb-Derksen

  I cut the body from brown kraft paper and added a couple of tiny gems for the antennae. the “shell” is composed of two cuts - a plain circle, then the spiral cut - so that the circle acts as a backdrop to the spiral.   I popped the shell up using some foam tape and then I embossed both parts of the snail because they are shiny when I see them in nature! 

DOWNLOAD


Snail-Card_Barb-Derksen

Here is a card I made using my Snail file - isn’t it too cute for words?  I used a bit of designer paper for the shell, the possibilities are endless.

1-small-thing

Today’s 1 Small Thing is a picture or two of something I observed on my walk the other day:

Background story - I was just beginning my walk when I could hear quite a ruckus from some birds.  They birds sounded strangely like a Catbird - a queer cackling and mewling, almost like a cat or kitten.  At any rate there were a few of them interacting.  looked down and saw a baby but it hopped off in a hurry before I could have my camera out.  I also espied:

Snake

This wee snake, trying to hide underneath a shrub.  Was it trying to get away from the birds - thinking it would wind up as “bird spaghetti” or something? 

The birds themselves proved to be very elusive and I had to really hunt to locate a glimpse and finally was rewarded with this picture:

Strange-Bird_Barb-Derksen

Do YOU know what type of bird this is?  I’d love to know.

PS - In case I don’t get back here soon, HAPPY CANADA DAY weekend!

Monday, January 20, 2014

Sweet Sunday Sketch Challenge No. 203 & a FREE .studio card banner

Sunday is a day of rest and I can’t think of a more restful thing for myself than to create something beautiful. I checked out a few challenges and decided to make the following:

Sweet Sunday Sketch Challenge No. 203

I like to have a mitt full of birthday cards on hand so I chose to make this my theme:

SSS-203-2_Barb-Derksen

SUPPLIES:

Designer Paper - ‘Apron Strings’ by Bella Road, various scraps and cardstock

Banner - ‘Eat Cake’ by Barbara Derksen (thats me!)

Silhouette Sketch Pen - black

Stamps - Fiskars

Gem

Gelly Roller sparkle pen

TomBow markers - N75, 553, 312, 969, 090,991

Embossing Folder

SSS-203-1_Barb-Derksen

I’m giving you the FREE .studio cutting file so you can create your own “Eat Cake” banner.  I designed this banner with the word “Eat” for you to make with a sketch pen but the CAKE as a cut from the cardstock.  You will have to be sure to check you have the appropriate settings in your Silhouette Cameo, SD or Portrait. 

DOWNLOAD

NOTE: I have updated some files into the FREE .studio TAB (top of my blog) so be sure to check.  I added:

  • Paper Cone Christmas Tree
  • Merry Christmas Doodles
  • Bow Tie
  • Lovely Lemon
  • Heart and Wings
  • Mrs Miles Love Bug

This makes them easy to find.  I will be working my way to add all the FREEBIES from 2013. 


1-small-thing

Today’s 1 small THING is a tip from my household to yours.  I don’t know about you, but sometimes when I water plants I manage (somehow, no matter how careful I am) to get dirt outside the plant pot.  I thought and thought and came up with this solution -

Watering Jug & Baster


A jug, jar, pitcher or any other container for water (preferably with a handle) and a turkey baster.  This allows you to ‘portion out’ the amount of water each plant receives and also allows a greater control and direction of the watering. 

I know… your carpets and floors will thank me Smile

Thursday, January 09, 2014

FREE Thread Keeper Cutting File and Freshly Made #118 Card

I usually ‘toss’ my crafts area first thing in the New Year, but this year my (mega-talented) Mr. is recording and mastering a music album with a friend and he needed pin drop, don’t breathe absolute quiet when that was happening.  No flushing toilet, no shutting doors, no phones - even the furnace gets shut down so the fan can’t interfere.  (brrrrrr!)  You will hear more about this in the future…

What does this have to do with the title of my blog?  Well, now that the recording week is over and I can make ALL THE NOISE I WANT, my thoughts are once again niggling on ways to make my craft room more efficient.  One area that needs serious attention is all the bits and bobs of wool, twine and ribbon.

Thread-Keeper-2_Barb-Derksen

I once picked up this whole container of bits of embroidery thread at a thrift store for $5.  I really liked the way these can be organized and labeled.  So I have modeled my own cut file to make more.

What to do with the little snippets one picks up, or gets via “sharesies” with a friend or family?  Solution:

Thread-Keeper_Barb-Derksen

DOWNLOAD

Personal Use

(zipped file with TOU)

Please PINterest my cutting files, or tweet, FB, shout out from your own blog (meaning don’t pirate my design but just point here, please)  Every link helps fuel my desire to keep creating!  Thank you in advance.

I will be giving you two Silhouette .studio cutting files, one today, the next in a day or two So stay tuned.

Freshly Made Challenge #118

Here is the sketch posted to base our cards off of:

and then MY take…

Freshly-Made-Sketches-118-1_Barb-Derksen

SUPPLIES: - 133, 177, 158, 743

Designer Paper - Crate Paper

Markers - Tombow 

Stamp - Fiskars (I’m pretty sure)

Grommets - Recollections

Gems

Glossy Accents

Ribbon

Freshly-Made-Sketches-118-2_Barb-Derksen

Isn’t this critter just the cutest? 

Thursday, January 02, 2014

Family Challenge 8 & a FREE . Layered Flower cutting file for YOU!

I offered to create a new Family Challenge with my sister in law Judy and my sister Nina so they held me to it today.  I tossed out this theme - BUTTON!  Basically a card with anything goes but must contain a button. 

So, since I had an idea in my head I decided to make this a .studio cutting file too so that you might create your own card or project. 

Family-Challenge-8-1_Barb-Derksen

This is a bit of an odd-sized card - I created it to fit inside of a #8 sized envelope (3 5/8 “ x 6 1/2”)  The card face I made is 3 1/2 inches wide by 6 1/2 inches tall - so you need to cut your inside cardstock to 7 inches wide, 6 1/2 inches tall and fold it in half on the 7 inch side.  If you’ve made cards before you will figure it out.  I’m also including the same card face cut for a standard quarter-fold card (4 1/4 inch wide by 5 1/2 inches tall)  Its just that I always pick up odd sized envelopes at thrifts, garage sales and I have 100 of the #8 and wanted to use some up.  I think its striking being tall with the flower too. 

SUPPLIES:

Cutting file - Layered Flower by Barb Derksen

Basic cardstock (I used white, but trimmed and glued a piece of dark green behind the area where the flower cut out is.

Embossing folder - you don’t need one but I think it makes it nicer.

Designer Paper - your call, this is a great chance to use up scraps, by layering! 

Gel pen - I used silver and ‘free-handed’ the sentiment inside the leaf.

Gem

Button - I used a sweet little button made of seashell

Crochet cotton - something you can find at any thrift for like 50 cents a ball.


Family-Challenge-8-2_Barb-Derksen 

METHOD:

First, trim your basic cardstock to the size you want your card to be and fold. Next, cut out your card face and then you can choose to emboss it - or not.  Once you have done this you can select a foliage colored cardstock and stick it onto your card base where it will show through where the flower stem and leaf cut is.

Family-Challenge-8-3_Barb-Derksen

Now, apply glue runner, or double sided tape, glue to the front of your card base and foliage colored cardstock, being careful to not apply either of these in the area where you see the stem or leaf cut opening.

Now, choose your designer paper and cut the flower layers out.  Once they are cut, take them and ball them up in your hand and squinch them around until they are soft, supple, crinkly and worn.  Layer them one atop each other, pick a button, crochet cotton and using a larger size needle (mine says its for candle wicking - another thrift buy) and then sew all the layers together, through the button, leaving lots of room at the beginning with which to tie a cute bow. 

Lastly, using a marker of a light or gel color, write in your sentiment - or you can leave this blank if you wish.  Voila!

I hope you enjoy this personal-use cutting file as well and make some beautiful things for someone you care about. If you enjoy my FREE files (which take a bit of time to put together, package etc) would you please consider any of the following: follow me, re-blog me, comment, PINterest me, Twitter, instagram or Facebook this post. Thanks so much!

Don’t forget to visit Nina and Judy’s blogs to see what they made using a “BUTTON” theme!

Layered-Flower_Barb-Derksen

DOWNLOAD

Monday, December 30, 2013

FREE football .studio Cutting File

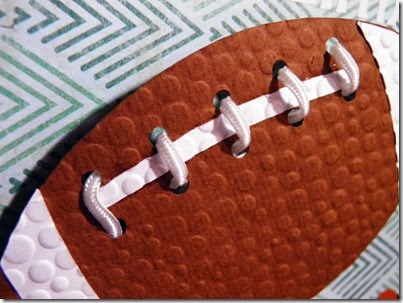
I am rushing rushing to bring you at least one more free cutting file this year.  I had made another custom card for a friend and she requested it be a football theme.  So voila!  This file is sized to fit nicely on a landscape quarter-fold card (5 1/2 x 4 1/4 inch) 

Football-1_Barb-Derksen 

SUPPLIES:

Football Cutting File - Barb Derksen

Cardstock - white, brown

shoelace or white ribbon or twine

Embossing Folder - Cuttlebug (optional)
Football-3_Barb-Derksen

I cut the football pieces on my Silhouette Cameo.  I glued them on at the areas you see in the picture.  Once it was dried completely I ran the football through this pebbly look Cuttlebug embossing folder.  Next, I threaded some cord through the holes.  I used this football as an element to make this card a “wobbler” (click to read a past post on wobblers) but you might simply have it secured and stand out by using foam tape to raise it up over the card.  I hope you enjoy this file for your personal use projects. 

DOWNLOAD

Will you consider PINteresting my post, facebooking or twittering me please?  Thank you huge!

*****

new-year


Let go of the old,

Reach out for the new,

For the past is cold,

And the future is due;


Each year holds memories,

Some happy - some sad,

We must treasure the good,

Let go of the bad;


Make the most of each day,

At work and at play,

For the old year is history,

The future - a mystery


~ Phyllis Ellison


As another year comes to a close I want to encourage you.  Think big picture.  Live in “real-time”.  Life is such a precious gift and is where we work out our unique purpose and plan God intended for us.  Trust in this. 

You might think your days and ways “ordinary” but God often does extraordinary works through the most ordinary of persons.  Don’t self-doubt, for we can easily get stuck in the inertia of this.

Do good things.  Be love in action, there is never a shortage of ways you can make a positive impact wherever you are. It takes so very little.  A kind deed, a helping hand, a random act, a phone call, a letter, be a shoulder, an ear. The  more action you have of doing good, the less time you dwell on your own problems - and seriously, some will simply fade away.  In light of the needs of others we often realize how truly blessed our lives are.  Perspective is good for the heart and soul.

Listen twice as much as you talk.  Turn off your cellphone when you’re with people if at all possible.  Notice details.  Put yourself second to the person you are with.  Love others with all your heart and it will come back to you.  Pure love is irresistible.

Let go of the past.  Burn it, crush it.  It is not recyclable and there are no “do-overs”.  The past is for learning.  What worked, what didn’t.  You learned your tongue can get you in trouble.  You learned your tongue also could build someone up.  Your tongue betrayed you, and it also made a good difference in other situations.  Take all the regrets and turn them into “what not to do’s”.  Practice.  It takes practice and…

Embrace your imperfection.  You were created to be imperfect.  Don’t waste even one of your numbered days trying to become perfect - it will never happen.  Do your best, then rest.  Imperfection keeps us humble.  Imperfection teaches us.  Even the one who created us allowed His son to be born into an imperfect human body so that we know He knows each and every thing we go through. 

Extend grace, peace and love to others.  Love them without reservation.  If you don’t understand someone, at least respect them.  When you respect someone else’s point of view you allow yourself to consider new things - ways you may not have considered.  Remember, its so easy to look into someone else’s life and make assumptions. Care enough to check them out.

True changes of heart can only be inspired through love.

Don’t expect others to do the footwork for you - as my friend Kayla puts it BE the change!  Your example can inspire!  

And though this post is geared in the thought of a coming New Year, remember, God’s grace is new each and every morning (Lamentations 3:22-23) so its never too late to start a “New Year”.  We will all fall, but we keep getting up!

Thank you so much for visiting my blog over the years and for taking a moment out of your busy life to leave me comments etc.  YOU have had a positive impact on me. 

Wednesday, October 16, 2013

Family Challenge - (PICTURE WINDOW) & FREE .silhouette file

Hope my fellow Canadians enjoyed a wonderful Thanksgiving this past weekend.  Now I’m back on track and so…

Once again my talented family have challenged me to be creative.  Ah, I might complain but I do manage to get it done.  The challenge NINA put out was to create a “WINDOW” card like in the following video tutorial.

I’m a bit of a rebel, for sure for sure, so I created my own cut file for the “window frame” - making this for a birthday greeting. 

Family-Challenge-6-1_Barb-Derksen

SUPPLIES:

Cardstock

Designer Paper - Yearbook Collection by Studio Calico

Gems

Glitter Modge Podge

canvas sheet - dollar store

Sentiment Stick On - Creative Memories

Birthday Pic Window frame .studio file - Barb Derksen

I designed and cut the card face, frame and backing. 

DOWNLOAD

.studio file for this project

(please credit me and link back when using my files)

(PS pls - PIN-terest me, FB me and Twitter me too!)

for your Cameo, Silhouette or Portrait


Family-Challenge-6-3_Barb-Derksen

I glued the canvas behind the window, then put it together on the front of the cardstock base.  I rubbed the sentiment sticker onto the canvas. 


Family-Challenge-6-2_Barb-Derksen

I painted the body of the candle shape with glitter Modge Podge and lastly added some bling!

PS - the cut-out birthday candle shape left over from the Birthday window cut is a perfect accent to glue inside the card!

I hope you enjoyed this little show and tell and you will pop right over to Nina’s and Judy’s to see what they created for this challenge too!

Wednesday, September 04, 2013

Brilliant Lollipop Themed Card & FREE .studio Cutting file!

I’m just a “sucker” for simple and bright card and I am on a real kick for using vinyl lately so I decided to try out a simple design I had in mind. 

I am the queen of frugal, (because I choose to stay at home and try to live out my dream to create, create and create but it does not make me rich by any means)  When I make it to “real” high end craft stores I can often but drool over some supplies I’d like to have but accept that within my budget its not going to happen.  Out of this is born so many of my greatest ideas and designs. 

One of the wonderful things I felt attracted to in the stores were the Elizabeth Craft Designs Peel off Stickers.  They are fun and wonderful and I totally think they are worth the asking price.  I have bought a few packages when my Mr. came with me and he said I should treat myself. 

They are wonderful to stick and fill with ultra fine glitter or even just paint or ink.  But there are two limitations I found (besides the price for me)  The first thing is they are all sort of the same size - so here’s me who likes to custom tailor almost everything…

and the other thing is there are only so many designs (which are very nice, indeed) but again, I’m a rebel and I like a huuuuuge variety and I like to size it to fit whatever project want to do. 

So… I have been playing around with vinyl! 

Supplies:

Designer Paper - I used a Colorbok Specialty Paper Pack - Bright

Watercolour paper - Arches 140 lb

Vinyl - black

Ribbon - random


Lollipop1_Barb-Derksen

Lillipop Card

4.25 x 5.5 inch


Ok, so I’m telling you right off the bat my card is not warped, my photo of the card is warped… and I’d given the card away in the meantime. But you get the picture (pun intended) 

I designed this simple vinyl cut, and I use a high quality watercolour paper to transfer it onto - 140 lb arches in this case.  I cut the vinyl image, then I “weed” out the bits I don’t need and I use Contact Paper (the clear kind you can line shelves in your kitchen with) to transfer the image to the arches paper.

You must work delicately but you definitely get a pretty fine image!  I save (and have friends save) old credit cards or gift cards that have been used up and use them to smooth my vinyl over the paper.  First I position it over the paper where I think I would like it and then I fix one end down and slooooooowwwwly stick it down to the paper, all the time smooshing it in a straight path with the long side of the credit card.  After you have done it a few times and you gain confidence it becomes easier.


Lollipop2_Barb-Derksen


Once you have the vinyl outline stuck on then you can paint.  Now, once again I must stress that your finished product is only as good as the materials you use - and so in this case, though you will pay a healthy price for both arches paper (though it cuts down into many MANY projects) and a good set of watercolours or watercolour pencils - I believe these are essential.  The colors are so brilliant! 

I like to use an aqua brush, it means you don’t have to constantly rinse brushes out etc.  I simply swipe mine on a rag in between colors. 

I began painting in the middle and worked out, changing colors and blending them together into a little bit of an overlap to achieve a rainbow effect. 


Lollipop3_Barb-Derksen


The finishing touch is a pretty pink bow, a perfect touch for a sweet little girl. 

You might also (which I will be showing in an upcoming tutorial, use fine scissors and trim around your lollipop - turning it into an element which you could then “pop” up with foam tape. I have created this file to be sized for a standard 4.25 x 5.5 card, if you were to make “elements” from this file the vinyl might get pretty tiny to work with.  You may have to experiment.

I sincerely hope you enjoy this project.  I’d love to see what YOU make and feature your project here on my blog Smile

LOLLIPOP .studio FILE

(personal use unless you seek permission from me for any commercial use)

DOWNLOAD

Total Pageviews

Popular Posts