Sunday, August 18, 2013

Random Photo - Poppy & Inspiration

Poppy_Barb-Derksen


Whatever sort of day YOU are having, I want you to know that I’m praying for you today. 


Kind hearts are the gardens,

Kind thoughts are the roots,

Kind words are the flowers,

Kind deeds are the fruits.


Take care of the gardens,

And keep them from the weeds,

Fill, fill them with flowers,

Kind words and kind deeds.


- Henry Wadsworth Longfellow

Saturday, August 17, 2013

OVER THE MOON card - FREE Silhouette file!

I was “over the moon” crafting with my sister Nina when she visited me earlier this summer and I pulled out all the stops to go with whatever creative ideas I had.  I woke up in the middle of the night with the idea for this card and simply had to get it out of my head and “onto paper” the next day.  Does this ever happen to you, or am I like… obsessed? 

Here is what I made:

Over-the-Moon-Card1_Barb-Derksen

4.25 x 5.5 inch card

Isn’t this just too much fun? 

Supplies used:

Black cardstock base

Designer paper for trim (this was a scrap, not sure who to attribute)

Moon silhouette cut file - Barb Derksen (see end of post)

Silhouette Sketch Pens

Spackling

Glitter

Pearl Gems

I had a png file from a way back on my blog - the “Moon and Stars” FREEBIE from a long time ago, so dusted it off, imported it into my Silhouette Designer Edition software and traced it.  I had to do some cleaning up of it but wound up with a basic and simple cut. 

Method:

Over-the-Moon-Card3_Barb-Derksen

I am not including the sketch pens file, just the moon cut, but you could make your own sentiment - even stamping it on whith a white, silver or light colored ink or draw it on with gel pens. I printed my cardface with the sentiment first so that I knew just where I wanted the moon to be in relation to it. I filled some of the lettering in with gel pens and the MOON with a Clear Star Gelly Roll pen.

I cut the silhouette file out of cardstock and then I laid it on the card base where I wanted it positioned.  Next I mixed the spackling up and applied a thin layer to the stencil/tempate.  When I was happy with the texture I removed the stencil. 

Over-the-Moon-Card2_Barb-Derksen

As soon as I took the template off I quickly sprinkled a layer of glitter into the wet Spackling.  then I let it dry. 

Over-the-Moon-Card5_Barb-Derksen

I cut and added the designer paper trim and a few pearl accents.

Nina and I decorated the cut out shapes left over from the template, spackled and glittered them up and I’m thinking they would make a terrific mobile - just punch a hold in the top, add silvery thread or strings - you might just see this in a future post…

Enjoy this FREE file for your personal use!  Please credit me and link back when posting your creations online.  Come again in a few days as I have another great and creative tutorial lined up!

MOON TEMPLATES

(.sil file)

DOWNLOAD

Friday, August 16, 2013

Random Photo - Ospreys having “Cottage Envy”

Osprey-Cottages_Barb-Derksen

Can’t you hear it? 

The one osprey is saying to the other… “Those folks in the Osoyoos Cottages Have nothing on us.  Why, we have Air Conditioning (the fan blade) and a basement floor with an in-law nesting area - and even ladder access!” 

Giggle!

Thursday, August 15, 2013

Random Photo - Fuzzy Wuzzy dines!


Fuzzy-Wuzzy_Barb-Derksen

Nummy! 

For this guy its a nice green leaf, for me…

It’s sour cream and onion chips (preferably Old Dutch - not ripple) and like my sister Nina even better if it comes in the cardboard box which has two separate bags in it. It’s the sweet and salty caramel bugles.  It’s Hawkins Cheesies (SO Canadian!) It’s Chapman’s ice cream, in the big square plastic pail (great for making artisan bread in five minutes a day) - vanilla, for I like to dress it up myself with Watkin’s Vanilla Nut extract and gummy bears etc.  It’s….

(sorry, wandering off to the kitchen and pantry…………)

Technorati Tags: ,

Wednesday, August 14, 2013

Textured Flower Card - cool card technique!

I’ve seen some “texture” creams in Scrapbook shops but it’s always either hit when I have no money or its too expensive for my budget so I decided to look for a (frugal) alternative on the net.  I came up with the option to try some spackle and here is my finished project:

Dorset-Spackle-Card1_Barb-Derksen

5.5 x 4.25 card base


Supplies used:

Moon .sil file - Barb Derksen (free for you!)

Designer Paper - “Chiaro” from the Alla-Prima Collection

Clear Glitter

Spackle

Template made from a cereal box

gems


Method:

I trimmed the cardstock to fit the card base.  I then looked at the designer paper and found a partial blossom to match the pattern already on the paper.  I trimmed it out by hand using sharp scissors.  I set this aside.

Dorset-Spackle-Card4_Barb-Derksen

My husband loves this cereal and so I wind up with quite a few boxes and I simply hate to throw them out because the pattern is perfect for a template.  I cut it flat around the design leaving some room around the pattern for my messiness Winking smile  - positioning it where the blossom would end.

Dorset-Spackle-Card6_Barb-Derksen

Then I laid it on the designer paper and took some of this Dry Dex spackling and smoothed it over the leaves pattern using a spatula.  I kind of like this particular spackling as it goes on pink but dries white, this way I’m not tempted to play with it before it’s set.  I lifted the template off once I had the height and texture I wanted for the leaves. 

Dorset-Spackle-Card2_Barb-Derksen

And once they were completely dry (I believe I even helped hurry this up with either my heat embossing gun or my hair dryer, lil Miss Impatiant Pants that I am)

Dorset-Spackle-Card7_Barb-Derksen

So then I painted the leaves with my Pearlescent watercolors.  I bought mine at a scrapbook supply store but I have also seen them in Michaels too. 

Dorset-Spackle-Card3_Barb-Derksen

Then added touches of paint to the blossom and  I drizzled some glue (the TomBow is nice and fine) on the cut out flower and then…

Dorset-Spackle-Card5_Barb-Derksen

I sprinkled it with this fun glitter for interest.  I am a true glitter girl and I saw this just as I was leaving a shop and decided to take a chance on it.  The glitter was in larger bits than I’d generally consider but the price was right and I had my credit card along and… well!  I’ve since fallen in ♥ with it and have to stop myself from adding it to every little thing. 

I was happy with the way this project turned out.

Stay tuned and you will be treated to several more projects using both the spackling and the glitter!

Tuesday, August 13, 2013

Friday Mashup 122


UPDATE

Yayyyyy - I ROCKED the mashup 122 and now my sidebar is sporting the “I Rocked” sticker thing.  Too cool, seeing as its been forever since I took part in a challenge.  Thanks to the design team for selecting me.  Star

Its been a while for me to take up a challenge and my sister Nina said SHE was going to do one …  and the hankering got to me so I whipped together a Friday Mashup card:
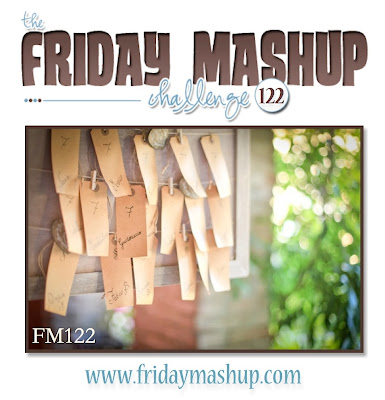
So, this week it was all about TAGS.  Here are the choices we were given:

  1. Create a project with a "Tag (as an embellishment on you rproject or as the project itself )."
  2. Create a project using the colors "Crisp Cantaloupe, Soft Sky, Primrose Petals & Bermuda Bay".
  3. Or Mash it Up and create a project "with a Tag using the color combo above".


And here is what I managed to do with that:

FM122-1_Barb-Derksen

So, that was about as close as I could come with the theme and the colors.


Supplies:

Cardstock - Hero Arts - Hero Hues

Cardstock - We R Memory Keepers - textured cardstock pad

Tag

Stamp - Studio G

Embossing Folder - Anna Griffin - Foulard

Circle Doilies2 cutting file by Bird

crochet thread

Method:

I cut a cardstock face to 4.24 x 5.5 inches and embossed it. 

FM122-3_Barb-Derksen

The tag, now that’s a funny story, my sister Nina gave it to me from a clothing item she bought.  I saw possibilities right away, just was not sure when I would use it.  Once I saw this challenge I knew this was it. 

FM122-2_Barb-Derksen

I painted the tag over the logos using a warm white acrylic and let that completely dry. I stamped it with the birthday greeting.  I was happily surprised how fine it is to stamp onto canvas! (filing that info away into the creative tools portion of my brain)

Next I cut out Bird’s GORGEOUS Doilys2 file to the size I wanted, leaving a bit of space on either side so that I then cut a simple scallop out of the peachypink cardstock and layered it behind. 

While cutting those two items out I used Flower 1021 and Flower 1022 from the Silhouette online store.  I designed a hole into the middle of each, sized them three different sizes.  They are about 3/4 to 1 inch. 
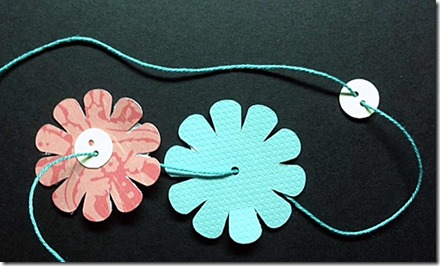
FM122-4_Barb-Derksen

I designed my own little “anchor button” and cut out two for each flower.  Then I threaded up a bit of crochet thread and I threaded it through one side of the button, down thru the flower, out through and back the second button and all the way back to the other side of the first button so that I could anchor the flower together and be able to make a sweet little bow in the middle of each blossom. 

Then I assembled the whole works with glue and glue dots and foam tape in copious amounts. 

I’m providing the little anchor button for YOU to download if you wish.  This is sized tiny for small flowers but if you’re an experienced Cammy-user you could easily resize (keep in mind to ungroup and only expand the OUTSIDE so the holes stay nice and small) 

Anchor Button

DOWNLOAD

Do you wonder what Nina’s card turned out like? click HERE


to see!

Sunday, August 11, 2013

Fun 45 Record Card - FREE Silhouette Cut file!

We know someone who ♥ records and so when his birthday rolled around I decided to theme a card around his passion for “vinyl”.  I’m not, of course, talking about vinyl as in the stick on type - but the kind of vinyl we all used to listen to.  I’m aging myself here, ha ha!

45-Record-Card1_Barb-Derksen

I had SUCH FUN with this one and I hope you do when you use it too.  It is a tricky project if you have not used the Silhouette Sketch Pens before.  If this is the case then you might want to use the blank template I’m including and then just add your own stamped or hand drawn touches to it. 

We will use the (black) “record” part first.  Drag all files except the large record part off of your cutting area in the software.   First you will make the “rings” - they are simply lines drawn using a silver Silhouette Sketch Pen. Load a piece of black cardstock into your machine and a Sketch Pen into the holder. 

After you’ve sketched in the lines you will need to ungroup the cutting file (ctrl + u) and then select and delete all the inner lines -but not the outside line and then cut the shape out (I used the cardstock setting)


45-Record-Card2_Barb-Derksen

Now it’s time to work on the inside piece.  Load a piece of yellow (or whatever color you choose the middle to be) cardstock into the machine. 

Drag the smaller “inside” cut onto the cutting area.  If you are going to use the Sketch Pens then you will load that into the holder. Click on the file and ungroup.  Delete the outside line.  Now command your software to sketch (cut) the text. 

Once your text is complete, trade out the Pen for the blade and set it to the cardstock setting.  Now use the undo command (ctrl + z) to get the outside line back.  When you have this, then click on the text and delete it.  You will be left with just the outer line and you will tell your Silhouette to cut this.  Voila! 

I added a sentiment on the inside of the card which says “Hope you have a RECORD year!”  I hope you enjoy this file. You may use this file for your personal use.  If you would like to make cards to sell at craft fairs or on a small scale I ask you display a credit to me and a link back on my blog site.  If you want to use my design on a large scale I will need you to seek written permission from me. 

I’m always open to donations to offset the time and effort that goes into my designs so I can provide them often and at no cost.  Why not be a “Robin Hood” for others who may not be so fortunate? 

45 Record Blank File

DOWNLOAD

45 Record File - full file with sketch lines and text

DOWNLOAD


Blogger Labels: Record,Card,FREE,Silhouette,records,vinyl,Sketch,template,files,blade,sentiment,donations,File,DOWNLOAD,cardstock

Thursday, August 08, 2013

Soda Pop Can Card - a highly experimental project…

I get all these crazy ideas.  Well, probably we all do, but I kind of take them and run.  Take for instance this crazy card I made:

Soda-Pop-Card1_Barb-Derksen


Seriously, I’d go to sleep at night thinking about this card idea.  I’ve been on a bit of a brain binge on ideas to recycle, re-use, up cycle… whatever you want to call it. I discovered I could easily cut a Soda/Pop Can/Tin (some differences in what you call it if you are from Canada or elsewhere) into sections and I’ve used the other bits in a myriad of projects but I was hankering to use that top for something profound. 


Soda-Pop-Card2_Barb-Derksen


I left a little length (about 3/4 inch) on the top and cut little slashes all around so that I could then  lay the pieces flat and use them as an anchor behind the card face. (I had to hammer them nice and flat)  Yes, I invested quite a bit of time designing and cutting the face hole so the can JUST fit in snug.  Then I glued it in positon and stuck it to a cardstock 1/4 fold card base. 

Then it was the fonts, I used some black vinyl and made the tedious teeny-tiny letters and then the glitzy FIZZ letters cut out of glittery cardstock which I stuck on then drew in a shadow using a black sharpie.


Soda-Pop-Card3_Barb-Derksen

Then I had to make the “glass, and the “Pop” itself.  The glass was made from some Glossy Accents …

Soda-Pop-Card4_Barb-Derksen

The pop is some glittery Modge Podge my sister Nina left with me.  That stuff has been used for quite a few highly experimental and exciting projects since.

What’s the most unusual item you’ve used in a project?  Was it a success or fail?  I spent a great deal of time on this card, but I think even for the fun factor it was totaly worth it.

Soda Pop Can Card - Girl with Birds

Anyone who knows me is pretty used to me getting excited about trash.  Um hmmm - I see treasure in the most odd bits of things most people toss out without a second thought.  I’ve pulled out all the stops with my creativity this past year and I have challenged myself to “think OUTSIDE of the box” so to say.  The recycle bin at our house has become my art supplies box and I think you might be pretty impressed when you see some of the unique projects I’ve dreamed up. 

Today I’m going to feature a card I created using the Girl with Birds (FREE) cut from my previous post. 

Soda-Can-Card-1_Barb-Derksen

This card is what I term as a “giving” card - in other words, you would not want to mail this as its very 3 dimensional. 

Soda-Can-Card-3_Barb-Derksen

The girl and birds are teeny tiny vinyl cuts and I’ve adhered them onto… can you guess?  It’s the inside of a soda pop can! 

I have been experimenting with pop cans for a while now and I’m finding there are many fun uses.  I don’t have a photo of how exactly I did this but basically I cut both ends of the can off.  I allowed about 1/4 to 1/2 inch of leeway on both ends so that I could make small cuts all around.  This allowed me to then flatten the edge, all the bits, and they serve as an anchor.  I’ve reserved the top and the flat middle pieces for other projects. (woo hoo, stay tuned!) 

I decided to paint the can surface white - I used an acrylic but I think it would have been nice to use a spray paint next time.  When it was dry I stuck the girl and birds on, then coated it with a layer of Modge Podge which I sprinkled with ultra fine glitter.

Next I measured the can bottom (it was just over 2”) and designed a card face cut in my Silhouette software. I designed a simple scallop to fit around the edge. I added the stamped sentiment and layered it on some lovely designer paper from Kristin Cronin Barrow’s Boho Chic collection.  I made and glued the bow on.

Soda-Can-Card-2_Barb-Derksen

Then I pushed the soda can bottom into the card face and then glued the entire works to a cardstock base. 

Have YOU recycled anything unusual for a greeting card or project?  I’d love you to comment.  Thanks so much for visiting today - be sure to visit again soon as I have more blog posts queued up for you in a few days.  Smile

Blogger Labels: Soda,Card,Girl,Birds,OUTSIDE,FREE,words,vinyl,photo,ends,leeway,paint,layer,Modge,Podge,bottom,Silhouette,sentiment,paper,Kristin,Cronin,Boho,Chic,collection,Thanks,pieces

Monday, August 05, 2013

Dream a Little Dream - whimsical FREE file

Ah summer - it has swept me away.  I was shocked to see I’ve not posted for over an entire month!  I’ve had my head stuck in a creative cloud and I’ve had company too.   Creating and company - building memories and “stuff”, I’m in my element.  I had my sister Nina to myself for an entire week - we had a phenomenal time.

I don’t know quite where to begin so I’m choosing to go with one of my projects that I have a photo for on hand. 


Girl-with-Birds-Plaque3_Barb-Derksen


Supplies:

wooden plaque

Designer Paper - Boho Chic by Kristin Cronin Barrow 

Modge Podge

black vinyl

brads

Girl with Birds silhouette - Barb Derksen

flowers - Barb Derksen

silhouette sketch pen


I try to recycle wherever possible and this project was no exception.  I bought the plaque at a yard sale.  It did not look like much when I purchased it, for sure - just a plain old scuffed up thing. 

First I gave the wood a coat of white acrylic paint.

Next I measured and mapped out the shape for the background. I coated the surface of the wood with a layer of Modge Podge and then affixed Kristin’s beautiful and soft designer paper to it, smoothing with a credit card to remove any bubbles. 


Girl-with-Birds-Plaque1_Barb-Derksen

She really is lovely!

I scanned  the girl silhouette from an old school book (1934) and then I traced her, sized her with birds, a random small butterfly and cut on my Silhouette Cameo and when the designer paper was fully dry I applied the vinyl cuts.  I suggest you think about placement of your vinyl and perhaps lightly mark where you would like it to be ahead of time.  I often make a “thumbnail” or small ‘sketch’ of what I think the project should look like in the end, even measuring each area. 

Once my girl was placed I then made and added the scallop and sentiment.  The sentiment was placed on some cardstock and is a combination of vinyl lettering (DREAM) and the middle text using a Silhouette Sketch Pen. I ♥ using my pens for text as I can make it fit whatever size I want. 


Girl-with-Birds-Plaque2_Barb-Derksen


At the end I embellished the scalloped sentiment with several layered flowers (a simple 6 petal design I made way back, but I added a hole in the middle for this project to accommodate the brads. I created a simple leaf shape to go with the blossoms. 

Today I’m giving you this lovely girl and birds silhouette for you to use for your own projects - enjoy!  You may use these for any projects you create and even sell, however if you use these for commercial purposes I would ask you credit me (donate if you’re feeling generous?) and link back to my blog please.  I’m providing this in both a PNG format (for designers and digital scrapbookers) and also as a Silhouette cut file. 


GIRL AND BIRDS PNG

DOWNLOAD

GIRL AND BIRDS SIL FILE

DOWNLOAD

This plaque was for sale at The Crow’s Nest but has sold.  I hope to build another as I have another block just waiting!

Be sure to check back in a couple of days when I will be blogging another project using this Girl with Birds cut in a completely different way.  Thanks for visiting! 

Blogger Labels: Dream,Little,FREE,memories,element,Nina,photo,Supplies,plaque,Designer,Paper,Boho,Chic,Kristin,Cronin,Modge,Podge,vinyl,Girl,Birds,silhouette,Barb,Derksen,flowers,exception,yard,sale,wood,paint,background,layer,card,bubbles,Cameo,placement,area,Once,sentiment,combination,text,Sketch,size,leaf,DOWNLOAD,FILE,Nest,Thanks,purposes,brads

Total Pageviews

Popular Posts